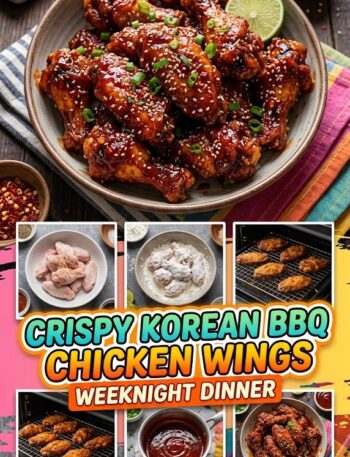

In the world of home cooking, few dishes strike the perfect balance between “comfort food” and “nutritional powerhouse” quite like the chicken tender. However, the traditional deep-fried versions found in fast-food joints and freezer aisles are often laden with unnecessary fats, preservatives, and empty calories. Enter the Oven-Baked Chicken Tender with Sesame Garlic Sauce. This isn’t just a recipe; it’s a lifestyle shift for anyone looking to master the art of meal prep without sacrificing the bold, umami-rich flavors of East Asian-inspired cuisine.
In this comprehensive guide, we will explore why baking is the superior method for the modern kitchen, the science behind getting that elusive “crunch” without a deep fryer, and how to create a Sesame Garlic sauce that rivals your favorite takeout spot. Whether you are a fitness enthusiast tracking macros or a busy parent trying to feed picky eaters, this dish is your new secret weapon.
Why Oven-Baked Chicken Tenders are a Meal Prep Game Changer
Meal prepping is often associated with bland broccoli and dry chicken breasts. The Oven-Baked Chicken Tender changes that narrative entirely. By utilizing the oven, you can cook large batches simultaneously, ensuring that you have protein-packed snacks or main courses ready for the entire week.
The Health Advantage
Traditional frying submerges chicken in oxidized oils, significantly increasing the calorie count and trans-fat content. Baking, on the other hand, allows you to control the type and amount of oil used. By using a light spritz of avocado or olive oil, you achieve a golden-brown exterior while keeping the heart-healthy profile of the lean white meat intact.
Versatility in Flavor
While the chicken itself provides a neutral, high-protein canvas, the Sesame Garlic Sauce is where the magic happens. This sauce acts as a glaze, a dip, or a marinade, allowing you to repurpose the chicken in various ways throughout the week—over rice, in a wrap, or tossed into a fresh garden salad.
The Anatomy of the Perfect Crispy Chicken Tender
To achieve a restaurant-quality crunch in a standard home oven, you need more than just breadcrumbs. It requires a specific layering technique and an understanding of moisture control.
1. The Protein: Choosing Your Chicken
While you can slice chicken breasts into strips, purchasing “chicken tenders” (the pectoralis minor muscle) ensures a more tender bite. This specific cut is more delicate and cooks faster than the main breast muscle. If you are slicing your own, ensure you cut against the grain to prevent the meat from becoming chewy.
2. The Secret to the Crunch: Panko vs. Traditional Breadcrumbs
If you want that satisfying “snap,” Panko (Japanese-style breadcrumbs) is non-negotiable. Panko flakes are larger and airier than traditional breadcrumbs, which means they don’t pack down and get soggy. They create a “craggy” surface area that catches the heat and turns golden and crisp.
3. The Binder: The Three-Station Method
To ensure the coating doesn’t slide off your chicken, you must follow the classic dredging sequence:
- Flour (Seasoned): This dries the surface of the chicken so the egg can stick.
- Egg Wash: The glue that holds everything together. Adding a splash of water or hot sauce here can enhance the texture and flavor.
- Panko Mixture: The final layer of texture.
Crafting the Signature Sesame Garlic Sauce
This sauce is the soul of the dish. It manages to be sweet, salty, tangy, and pungent all at once. Unlike store-bought sauces that are often thickened with excessive cornstarch and high-fructose corn syrup, this homemade version relies on high-quality aromatics.
Key Ingredients for the Sauce:
- Toasted Sesame Oil: This provides the deep, nutty base. A little goes a long way.
- Fresh Garlic: We recommend using 4-5 cloves for a bold punch. Finely minced or grated garlic integrates better into the sauce than garlic powder.
- Soy Sauce (or Tamari): Provides the essential salt and umami. For a gluten-free version, Tamari or coconut aminos are excellent substitutes.
- Honey or Brown Sugar: To balance the salt and help the sauce thicken into a glaze.
- Rice Vinegar: Adds a necessary acidity to cut through the richness of the sesame oil.
- Fresh Ginger: Adds a bright, peppery heat that complements the garlic perfectly.
The Master Recipe: Oven-Baked Chicken Tenders with Sesame Garlic Sauce
Ingredients List
For the Chicken:
- 1.5 lbs Chicken Tenders (or breasts cut into strips)
- 1.5 cups Panko Breadcrumbs
- 1/2 cup All-Purpose Flour (or almond flour for a low-carb twist)
- 2 Large Eggs
- 1 tsp Garlic Powder
- 1 tsp Onion Powder
- 1/2 tsp Smoked Paprika
- Salt and Black Pepper to taste
- Cooking spray (Avocado or Olive oil)
For the Sesame Garlic Sauce:
- 1/2 cup Low-Sodium Soy Sauce
- 1/4 cup Honey
- 2 tbsp Toasted Sesame Oil
- 4 cloves Garlic, minced
- 1 tbsp Fresh Ginger, grated
- 1 tbsp Rice Vinegar
- 1 tsp Sriracha (optional for heat)
- 1 tbsp Cornstarch mixed with 1 tbsp cold water (slurry)
- Garnish: Toasted sesame seeds and sliced green onions
Step-by-Step Instructions
Step 1: Preheating and Preparation
Preheat your oven to 425°F (220°C). This high temperature is crucial for crisping the breadcrumbs before the chicken dries out. Line a large baking sheet with parchment paper or, for even better results, place a wire cooling rack on top of the baking sheet. This allows hot air to circulate under the chicken, preventing a soggy bottom.
Step 2: Setting Up the Dredging Station
In three shallow bowls, set up your assembly line:
- Bowl 1: Flour mixed with garlic powder, onion powder, paprika, salt, and pepper.
- Bowl 2: Eggs, beaten thoroughly.
- Bowl 3: Panko breadcrumbs.
Step 3: Coating the Chicken
Pat the chicken tenders dry with paper towels. Dip each tender into the flour, shaking off the excess. Submerge it in the egg wash, then press it firmly into the Panko breadcrumbs until fully coated. Place the tenders on the prepared wire rack.
Step 4: The Secret Spray
Before sliding the tray into the oven, lightly spray the tops of the tenders with cooking oil. This helps the Panko hydrate and brown, mimicking the effect of frying.
Step 5: Baking to Perfection
Bake for 15-18 minutes, flipping halfway through (and spraying the other side). The internal temperature should reach 165°F (74°C).
Step 6: Simmering the Sauce
While the chicken bakes, combine the soy sauce, honey, sesame oil, garlic, ginger, vinegar, and sriracha in a small saucepan. Bring to a light simmer over medium heat. Whisk in the cornstarch slurry and continue to simmer for 2-3 minutes until the sauce thickens to a glossy glaze.
Step 7: The Final Touch
Once the chicken is out of the oven, you have two choices:
- Tossed: Place the hot tenders in a bowl and gently toss with the sauce.
- Dipped: Serve the sauce on the side to maintain maximum crunch.
Garnish with sesame seeds and green onions.
Pro-Tips for Maximum Crispy Success
- Don’t Overcrowd the Pan: If the chicken pieces are touching, they will steam instead of crisp. Give them at least an inch of space.
- The Wire Rack Hack: As mentioned, using a wire rack is the single best way to ensure the bottom of the tender is just as crunchy as the top.
- Toast the Panko: If you want an extra-dark golden color, you can toast the Panko in a dry pan over medium heat for 2 minutes before using it to coat the chicken.
- Dry the Chicken: Moisture is the enemy of crispiness. Always pat your chicken dry before starting the dredging process.
Meal Prep Strategy: Keeping it Fresh All Week
The biggest challenge with meal-prepping breaded chicken is the loss of texture over time. Here is how to handle it like a pro.
Storage
Store the chicken and the sauce in separate containers. If you coat the chicken in sauce before storing it, the breading will absorb the moisture and turn soft. The chicken will stay fresh in an airtight container in the refrigerator for up to 4 days.
Reheating for “Day 1” Crunch
- Air Fryer (Best Method): Reheat at 350°F for 3-4 minutes. This will revive the Panko beautifully.
- Oven/Toaster Oven: 375°F for 5-7 minutes.
- Microwave (Avoid): This will make the chicken rubbery and the coating soggy. If you must use a microwave, accept that the crunch will be gone.
Freezing
These tenders freeze exceptionally well. You can freeze them after baking. To reheat from frozen, simply pop them into a 400°F oven for 10-12 minutes. This makes them a perfect DIY version of high-quality frozen chicken strips.
Nutritional Breakdown and Dietary Adjustments
This recipe is designed to be healthy, but it is also highly adaptable to various dietary needs.
Macro-Nutrient Profile (Per Serving)
- Calories: 320 – 380 (depending on sauce quantity)
- Protein: 35g – 40g
- Carbohydrates: 25g – 30g
- Fats: 8g – 12g
Dietary Modifications
- Gluten-Free: Swap the all-purpose flour for almond flour or a gluten-free 1-to-1 blend. Use GF-certified Panko or crushed gluten-free cornflakes. Replace soy sauce with Tamari.
- Low-Carb/Keto: Use crushed pork rinds or parmesan cheese instead of Panko. Replace honey in the sauce with a keto-friendly sweetener like Allulose or Monk Fruit.
- Egg-Free: Use heavy cream, buttermilk, or a flax-egg as the binder.
Elevating Your Meal Prep: What to Serve with Sesame Garlic Chicken
To turn these tenders into a balanced meal, consider these pairing options that complement the Asian-inspired flavor profile:
1. The Grains
- Jasmine Rice: The classic choice. Its floral aroma pairs perfectly with sesame.
- Quinoa: For an extra protein and fiber boost.
- Cauliflower Rice: To keep the meal low-carb while soaking up the extra sauce.
2. The Greens
- Steamed Broccoli: The crevices of the broccoli florets are perfect for catching the sesame garlic sauce.
- Garlic Sautéed Bok Choy: Adds a nice crunch and earthy flavor.
- Asian Slaw: A cold, crunchy salad made with shredded cabbage, carrots, and a ginger-lime vinaigrette provides a refreshing contrast to the warm chicken.
3. The Toppings
Don’t underestimate the power of garnishes. Fresh cilantro, pickled red onions, or even a few slices of fresh jalapeño can elevate the dish from “home-cooked” to “gourmet.”
Common Mistakes to Avoid
Even with a straightforward recipe, small errors can impact the final result. Here is what to look out for:
- Using Old Spices: Spices like garlic powder and paprika lose their potency after 6 months. Check your cabinet to ensure your seasoning actually adds flavor.
- Using Cold Chicken: Taking the chicken straight from the fridge to the oven can lead to uneven cooking. Let the tenders sit at room temperature for about 10-15 minutes before dredging.
- Skipping the Cornstarch Slurry: If you skip the slurry, the sauce will be thin and watery. The cornstarch gives it that “cling” factor that makes the dish look and taste professional.
- Overcooking: Chicken breast meat dries out rapidly once it passes 165°F. Use an instant-read thermometer to pull them out exactly when they are done.
The Science of Umami: Why This Sauce Works
You might wonder why the combination of soy, garlic, and honey is so addictive. It comes down to the concept of Umami, the fifth basic taste. Soy sauce is packed with glutamates, which signal “savoriness” to the brain. When you combine this with the sweetness of honey and the pungent sulfur compounds in garlic, you create a complex flavor profile that satisfies multiple taste receptors at once. The toasted sesame oil adds an aromatic layer that lingers, making the meal feel more filling and satisfying.
Frequently Asked Questions (FAQs)
Can I use this recipe for chicken wings?
Absolutely! The Sesame Garlic Sauce is incredible on wings. However, the baking time will increase to about 40-45 minutes at 400°F to ensure the skin gets crispy and the fat renders out.
Can I make the sauce in advance?
Yes. The sauce can be made up to a week in advance and stored in the refrigerator. It may thicken significantly when cold, so simply reheat it in a small pan or the microwave for 30 seconds to bring it back to a pourable consistency.
Is this recipe kid-friendly?
This is one of the most kid-friendly healthy recipes available. Most children love chicken tenders. If your children are sensitive to spice, simply omit the sriracha and reduce the amount of fresh ginger.
What is the difference between “Toasted” Sesame Oil and regular Sesame Oil?
Regular sesame oil is often used as a neutral cooking oil and has a mild flavor. Toasted Sesame Oil is made from seeds that have been browned, resulting in a dark color and a very intense, nutty flavor. For this recipe, you must use the toasted variety to get the characteristic taste.
My breading is falling off. What did I do wrong?
Usually, this happens for two reasons:
- The chicken was too wet before dredging.
- You didn’t press the Panko firmly enough into the egg wash. Make sure you press down with your palms when coating the chicken in the breadcrumbs.
The Versatile Leftover: Creative Ways to Use Sesame Garlic Tenders
If you find yourself with extra tenders at the end of the week, don’t just eat them plain. Here are three creative ways to repurpose them:
1. The Sesame Chicken Wrap
Take a large flour tortilla, spread a little bit of kewpie mayo or Greek yogurt on it, add shredded lettuce, cucumber matchsticks, and sliced sesame chicken tenders. Roll it up for a high-protein lunch on the go.
2. The Fusion Taco
Use small corn or flour tortillas. Fill them with the sliced chicken tenders and top with a quick slaw made of cabbage, lime juice, and cilantro. Add a drizzle of spicy mayo (sriracha + mayo).
3. The Asian-Inspired Salad
Chop the cold tenders and toss them with romaine lettuce, mandarin orange segments, almond slivers, and crispy wonton strips. Use any leftover sesame garlic sauce (thinned with a little extra rice vinegar) as the dressing.
Conclusion: Elevate Your Dinner Routine
Mastering the Oven-Baked Chicken Tender with Sesame Garlic Sauce is a milestone for any home cook. It proves that you don’t need a deep fryer to enjoy “fried” chicken and that healthy eating can be incredibly flavorful. By focusing on quality ingredients like Panko, fresh ginger, and toasted sesame oil, you transform a simple weeknight staple into a dish that feels like a treat.
This recipe is more than just a meal; it’s a solution to the “what’s for dinner” dilemma and a foundation for successful, stress-free meal prepping. Give it a try this Sunday, and enjoy the delicious rewards all week long.
Final Recipe Checklist for Success:
- Chicken patted dry?
- Oven at 425°F?
- Wire rack in place?
- Panko pressed firmly?
- Cooking spray applied?
- Sauce thickened with slurry?
- Garnish ready?
By following these steps, you are guaranteed a meal that is crispy, succulent, and bursting with the bold flavors of garlic and sesame. Happy cooking!